Thursday, December 22, 2011

Random end of 2011 baking

Because I have been slack (again) I am taking the easy way out (again) and doing a general update.

**Robot Cake**

This was for a friends child and I had a picture they had found on the internet to base it on.  It was reasonably simple to bake & carve etc but for some reason or another I just wasn’t happy with the finished product.  The birthday boy thought it was good and I guess that is all that matters!


**School Baking**

I made some snowman cookies for my son to take for his end of year class party.  I saw these on Bakerella’s site and even though mine aren’t as perfect as hers the kids ate them in a flash!!


I also made the whole class some reindeer food to help entice Santa to stop at their houses.  I had seen this idea ages ago in a scrapbooking magazine and after searching google I found the instructions and the poem and set to work.  After making about thirty of them I was wondering what I had been thinking!  It was worth it though as the kids were really appreciative which was nice.


I also made biscuits and brownies to give to the teachers and the staff in the office.


** 60th & 90th Cakes**

In November I had two extremely important cakes to create.  One was for my Mothers 60th birthday and the other was for my Grandmothers 90th birthday.  Oh, the pressure!!  To add to the challenge I was using my Mums kitchen (some 5 hours away from my own kitchen) and the weather was hot.

Mums cake was a Mad Hatter style cake, three tiers – chocolate mud, caramel mud & white chocolate mud.  It was my first attempt at one of these and it went pretty well.  Next time I would go a little bit smaller though and make sure the height was better.


Grans cake was supposed to look like a stack of presents but again I think I would make the tiers a bit smaller and have a bit more height.  When we took the cake down for the party it was 38 degrees and the cake also got a little squished during transportation!  The “icing on the cake”, so to speak, was when the power went off for about an hour and a half – we had to cut the cake by candlelight anyway....didn’t really matter what it looked like LOL!


The biggest lesson I learnt from creating both these cakes is to **always** check the size of your oven before ordering cake tins.  In my head the 12x12 inch square cake tin was the perfect size for the bottom tier.......unfortunately not the perfect size for my oven {insert red face here}.  Another point to consider is how on earth would you turn a cake that size out of the tin anyway?  I sure don’t have a cooling rack that is 12x12 inches!!

Friday, November 4, 2011

Teapots & Apples

These are the teapots I made for a friends daughters party.  It was a tea party theme.  I used marshmallow fondant for the handles but next time I might try candy clay.


I also made some apples for my son’s teacher for Teacher Appreciation Day.  I think these turned out really well.  I used marshmallow fondant on these too.  I love that they look really glossy in the photo.


Monday, October 17, 2011

Fire Truck Themed Birthday Party

My littlest boy turned three!  He decided some time ago that he wanted a fire truck cake.  I had a couple of designs in some cake books but I googled and found one I liked here.  I then had to figure out dimensions and cake pans and recipes etc.  It was a big task but it turned out really well and I don't think it was as hard to make as it probably looks!

Fire Truck Cake

My biggest drama was that I had no cake board when it came time to put the cake together - it's something I keep forgetting to organise *before* I start on the cake!  I had to trim the cabin cake a little to fit the board that I could find and that meant the run out icing windows etc were a little too big for the finished cake size.....but it's all good :)

Yes I did cake pops too......

Fire Hats
Flames
And I even went further and added some sugar cookies.....

Fire Vehicle Sugar Cookies
The party boy had a fantastic day and the look on his face made all my efforts completely worth it!

Saturday, October 8, 2011

Pirates and Owls

I did a "pre birthday" cake for my littlest boy and my Mum.  I had to use cake pops, of course, so I decided on Pirates and Owls.

Pirate Cake Pops
These were pretty easy.  I debated about using fondant for their bandana ties but went with a mini m&m instead.

Owl Cake Pops
I needed to take just a little more time with the eyes for these.  Next time I will slow down and try to make them a bit more smooth.  I need to say that I pinched the idea for the white spots on the belly from someone.....but I can't find who it was at the moment!  Once I find the image, I will link to it!

Here are the pops on a simple round buttercream cake - they look quite effective, I think.


Friday, September 23, 2011

Princess Castle, Cookies & Cake Pops

I was asked to do a cake for a friends little girl, turning three, and I suggested a castle cake.  I found one that I really liked here and set about working out sizes and recipes etc.  I decided on three different varieties of mud cake - chocolate, white chocolate and caramel.  I baked two trial cakes, just to make sure the recipes would work in the size tins that I had - I sent these of to work with my hubby as I didn't need two yummy cakes staring at me everytime I went to the kitchen.

I ended up using a 10" round tin on the bottom layer; a 6" round tin for the middle and a stack of two 7.5cm cakes for the top.  Although it's a little (LOT) more pink than I intended it to be; and it's a little (LOT) wonky, especially in some places; I'm pretty happy with my attempt overall.  I've decided that professional cake decorators can truly charge any price they wish......it's sooooooo hard for us humble Mum's to replicate their artwork!!  They really are so very talented at what they can do with some cake and some icing LOL.


Of course, it wouldn't be a princess party without the addition of some Princess cake pops.  My first attempts worked really well (they have the gold crowns) and then I decided that since I had a ton of pink icing, I would make the crowns pink.  I think they look good either way.

Princess Cake Pops


I also tried my hand at some Sugar Cookies.  These are a basic cookie dough that is cut to shape and then decorated with royal icing.  I was happy with my trial batch and then I got a little impatient with the batch for the party and ended up with air bubbles.  They still went down a treat though.  I don't think anyone really noticed the bubbles!

Thursday, September 15, 2011

Snowmen

Ironically, it was quite warm while I was making these.  True to form though, it turned bitterly cold again within a week!

Snowman Cake Pops

I used dark chocolate piped onto baking paper for the arms.  I also used dark chocolate piped over the top of a mini m&m for the hat.  I'm not overly fussed on the hat because I can just see it falling right off and, of course, the arms would be quite brittle too.  If I was making them for family, I would probably add the hat; but if I was making them for someone else, I think I would leave the hat and the arms off as well.  I think they look cute without them.....but they do look cute with them as well :oP

Sunday, September 11, 2011

Chickens, Roosters, Pigs and Bears!

I decided to tackle chickens again because I wasn't overly happy with my first attempt and I would like to avoid using fondant "accessories" where possible!

This time I molded the cake into the shape I thought best resembled a chicken and then added features after they'd been dipped.  This process ended up being quite easy.  The added bonus is that there are less parts to fall off during packaging and transportation.

Chicken Cake Pops

The roosters were quite similar but with an added peak (or mohawk) at the top.

Rooster Cake Pops


I think the pigs can do with a little more fine tuning as I would like the nose section to be a bit less subtle.  I did dust them over with some pink lustre dust but I will experiment a little more with them.

Pig Cake Pops

And finally, the bears.  My two darling boys tell me they are dogs so perhaps there is a little more work required on these too??  I'm thinking some textured "fur" might just do the trick!

Bear Cake Pops

I've also discovered that it is quite easy to just use dark cooking chocolate for the eyes, rather than trying to dye the melts to a suitable black colour.  It's also easier to dot them on using a skewer or toothpick, rather than trying to pipe them on (which is why my bears (dogs!) eyes look a little funny!

Thursday, September 1, 2011

Soccer Balls

A friend of mine asked me a little while ago if I could do some soccer ball cake pops for her daughters last soccer game.  I accepted the challenge but I almost changed my mind quite a few times.  Firstly, I didn't realise that a soccer ball is made up of pentagons *and* hexagons.  I did a few test subjects and quickly found out that if my cake balls weren't perfectly shaped then there was no way the soccer design was going to work on them.  After cutting out a total of 198 pentagons from black fondant by hand (!!), this was the result:

Soccer Ball Cake Pops

Phew!!  From now on if anyone wants soccer balls I am seriously charging $3 per pop!!  They look great though, right??

Tuesday, August 30, 2011

Beers for Dad

I had a go at some beer mugs and beer glasses for Fathers Day.  Although the colouring is a little bit off, they worked quite well.  Apologies for the smudge on the lens.....would you believe it was chocolate!!  Did someone get a bit too close with their macro photography, perhaps??

Beer Mugs Cake Pops
 
Beer Mug Cake Pops

Beer Mug & Glass Cake Pops

Thursday, August 25, 2011

Houses & Robots

I made some houses for a friend who has recently moved into her brand new house.  I initially didn't like the way they looked after I had piped on the windows; but they quickly grew on me.  These were going to be my first test at posting some via Australia Post but they had an upcoming trip out this way which meant I could hand deliver them instead.

House Cake Pops

And I did some robot testing for a job I need to do at the end of October.  I'm pretty happy with how they look, except for the fondant antennae.  I will have to make these a bit more in advance and not be so impatient with letting them dry!

Robot Cake Pops

Sunday, August 21, 2011

Simple Drizzle and Sanding Sugar

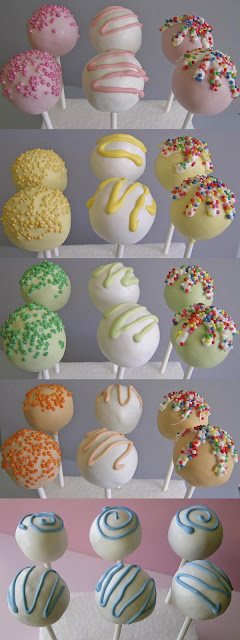
I believe my chocolate piping skills are finally improving.  I am managing to get more chocolate onto the cake pop rather than onto myself, which has to be a good thing!  I really like the look of the simple drizzle done in a coordinating colour and I can see these becoming a favourite of mine.

These were also my first attempt at a Red Velvet cake flavour.  I'm not sure that I really get the whole Red Velvet fanfare.  To me it tastes a bit like a chocolate cake that isn't quite chocolatey enough.  They do look amazingly fantastic when you bite into them though, so perhaps that's what it is all about.

Simple Drizzle Cake Pops

Sanding Sugar Cake Pops

Thursday, August 4, 2011

Delta Cream Cupcakes

I've done some more baking.  I've made Lemon Curd Squares (from Donna Hay magazine number 51) and although I had some drama getting it out of the pan, it was yummo!

I've also came accross some Oreo cupcakes on Bakerella's blog - you can find her recipe and gorgeous pics here.  I changed mine to use Delta Cream biscuits, to keep it a little Aussie.


While mine are definately not as pretty as hers, they tasted fantastic.  My major discovery was the icing recipe - Bakerella used shortening, which we don't have access to here, except for Copha, soooooo I tweaked a recipe I found in my Whoopie Pie cookbook (by Angela Drake) and came up with:

MARSHMALLOW ICING

1 packet white marshmallows
4 tbs milk
100g copha
1 cup icing sugar (maybe a bit extra)

Melt the mallows and milk in the microwave, allow to cool to about room temperature.
Melt the copha in another bowl and allow to cool slightly. Beat the icing sugar into the copha and then beat in the mallow mixture. You can add more icing sugar, if required.


I didn't really think it would work because the copha is so, so solid in it's original form, but it worked amazingly.  It was quite white (until I added the cookie crumbs to it, which I wish I'd left out!) and it was reasonably easy to pipe (a bit messy to try and spread on) and it stays soft but ends up quite stable to touch.

Mmmmmmm.

Wednesday, August 3, 2011

Transformers

Last week I felt like I was lost inside a cake making, chocolate coating, icing piping time warp.....the only trouble was the rest of the world didn't get lost in there with me!  Wish I could freeze time; that's the power I would have if I ever get asked by some random wish-giving genie.

My Transformer Optimus Prime cake worked a treat.  I was incredibly happy seeing it evolve and I learnt a couple of tricks along the way.  My favourite was using a frozen buttercream transfer.  I'd read about it previously and, once I'd spent an incredibly long time drawing up the template (stupid robot hands!!), I decided there had to be an easy way to transfer that to the top of my cake.  The previous two times I have cut the paper design into sections and physically drawn around it onto the top of the cake; and then piped over it.  I watched a couple of video tutorials and, although I am not too keen on the "whole" design being done as a transfer (it ends up looking too one-dimensional for me), I thought it might just be the solution I was looking for. 

Basically, you stick some baking paper over the paper design and secure the whole thing to something solid, like a chopping board.  You then pipe the outline (I used black buttercream) onto the baking paper and put it in the freezer.  I would leave it there at least a few hours, mine was in there for a day.  When you're ready to put the design onto the cake you, quickly, remove it from the freezer and flip the baking paper onto the top of your iced cake.  Press it down gently (but use something like a spatula as otherwise the buttercream begins to melt from the warmth of your hands) and then carefully pull the baking paper off.  Voila!!!

It's not a completely "clean" outline, like it would be if you just piped it on directly, but it's pretty cool.  You can just touch up any areas that didn't transfer properly.  This saved me sooooooo much time and I will definatley be using it from now on.

From this.......
to this.......


The other thing I figured out is to use a couple of pieces of styrofoam as a guide when levelling the top of the cake.  I needed something about an inch high and my styrofoam was exactly that.  I covered it in packing tape to make sure I didn't contaminate the cake and then I rested the flat surface of the knife against that while I was cutting.  Levelling cakes is not something I usually do....such a waste of good cake, in my opinion....but I wanted to make sure this one looked a bit professional!

My coordinating cake pops were a hit too.  They were supposed to be orange with blue piping and grey with red piping.  If you need to use any shade containing red, other than pink, it's best to buy the melts already coloured - as you can see, mine are a little on the feminine side of the colour spectrum!  I've also improved my chocolate piping skills - I discovered that the more melted chocolate you put into the piping bag, the easier it is to use!!

Decepticon Cake Pops

Autobot Cake Pops

Transformer Cake Pops

The birthday boy was totally impressed with it all, so that's a success as far as I'm concerned.

Friday, July 22, 2011

Trio Cake Pops

I've had another opportunity to do a bit more testing:
* The cake balls (ie: crumbled cake + icing) freeze well.  Let them come up to room temperature before attempting to dip them.

* The decorated cake pops travelled fine.  I put them into an airtight container and into an esky.  It turned out the weather was cold anyway so I possibly could have skipped the esky!

* The trio's are simple to do.  However, only doing a small amount of each colour is a bit painful.  Large batches would be easier.

* I'm still trying to figure out the right chocolate melting/piping temperature.  If the piping chocolate is too hot, it cracks the coated cake pop......but if it's not hot enough it sets inside the piping bag, making it useless!!


Wednesday, June 29, 2011

Cake Pops Galore!!

I have been in cake pop land the last couple of days and I had quite a bit more success with this lot.  I went for the cake used in the Donna Hay Chocolate Buttermilk Layer Cake recipe because it's already such a yummy cake.  I've easily ended up with around 60 cake balls so I have some sitting in the freezer waiting.

Fish Bowls
Happy Birthday Faces
Mr Bump
Lego Heads


Chickens
Mr Happy

Same Colour Swirl

Triple Coat

Mr Grumpy
Anyone want to guess how long it took to place those photos on here......arrrgh!!  So not computer savvy!!  Apologies if they still don't line up, but on my screen they do.....true!

I don't like the arms - they're too hard to do (which is why Mr Happy has a few fingers and Mr Grumpy has none!) and they're not going to take transportation too well.  I'm still working on something to replace them. 

I'm also finding the biggest drama with the fondant accessories is that, even though I form them on a rounded surface, they don't completely match up to the finished cake pop surface.  This was especially noticeable on the fish bowls, for the fish themselves and for the top of the bowls.  I really don't want to have to make each piece as I make each pop.....that's just too much work!!

Anyway, lets just say that I've learnt a few more things and there are also a few things that I won't try again!  For anyone wishing to colour their own white candy melts, the powder colours are cheaper but the results are not reliable as the powder won't fully dissolve into the candy.  I will be going for the oil-based colours next time.