Sunday, August 21, 2011

Simple Drizzle and Sanding Sugar

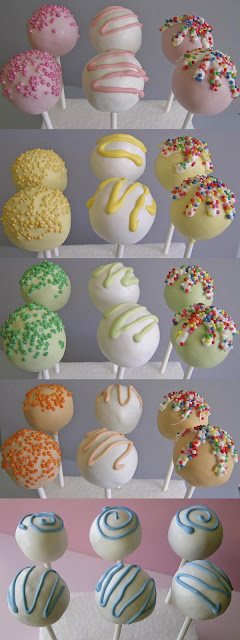
I believe my chocolate piping skills are finally improving.  I am managing to get more chocolate onto the cake pop rather than onto myself, which has to be a good thing!  I really like the look of the simple drizzle done in a coordinating colour and I can see these becoming a favourite of mine.

These were also my first attempt at a Red Velvet cake flavour.  I'm not sure that I really get the whole Red Velvet fanfare.  To me it tastes a bit like a chocolate cake that isn't quite chocolatey enough.  They do look amazingly fantastic when you bite into them though, so perhaps that's what it is all about.

Simple Drizzle Cake Pops

Sanding Sugar Cake Pops

Thursday, August 4, 2011

Delta Cream Cupcakes

I've done some more baking.  I've made Lemon Curd Squares (from Donna Hay magazine number 51) and although I had some drama getting it out of the pan, it was yummo!

I've also came accross some Oreo cupcakes on Bakerella's blog - you can find her recipe and gorgeous pics here.  I changed mine to use Delta Cream biscuits, to keep it a little Aussie.


While mine are definately not as pretty as hers, they tasted fantastic.  My major discovery was the icing recipe - Bakerella used shortening, which we don't have access to here, except for Copha, soooooo I tweaked a recipe I found in my Whoopie Pie cookbook (by Angela Drake) and came up with:

MARSHMALLOW ICING

1 packet white marshmallows
4 tbs milk
100g copha
1 cup icing sugar (maybe a bit extra)

Melt the mallows and milk in the microwave, allow to cool to about room temperature.
Melt the copha in another bowl and allow to cool slightly. Beat the icing sugar into the copha and then beat in the mallow mixture. You can add more icing sugar, if required.


I didn't really think it would work because the copha is so, so solid in it's original form, but it worked amazingly.  It was quite white (until I added the cookie crumbs to it, which I wish I'd left out!) and it was reasonably easy to pipe (a bit messy to try and spread on) and it stays soft but ends up quite stable to touch.

Mmmmmmm.

Wednesday, August 3, 2011

Transformers

Last week I felt like I was lost inside a cake making, chocolate coating, icing piping time warp.....the only trouble was the rest of the world didn't get lost in there with me!  Wish I could freeze time; that's the power I would have if I ever get asked by some random wish-giving genie.

My Transformer Optimus Prime cake worked a treat.  I was incredibly happy seeing it evolve and I learnt a couple of tricks along the way.  My favourite was using a frozen buttercream transfer.  I'd read about it previously and, once I'd spent an incredibly long time drawing up the template (stupid robot hands!!), I decided there had to be an easy way to transfer that to the top of my cake.  The previous two times I have cut the paper design into sections and physically drawn around it onto the top of the cake; and then piped over it.  I watched a couple of video tutorials and, although I am not too keen on the "whole" design being done as a transfer (it ends up looking too one-dimensional for me), I thought it might just be the solution I was looking for. 

Basically, you stick some baking paper over the paper design and secure the whole thing to something solid, like a chopping board.  You then pipe the outline (I used black buttercream) onto the baking paper and put it in the freezer.  I would leave it there at least a few hours, mine was in there for a day.  When you're ready to put the design onto the cake you, quickly, remove it from the freezer and flip the baking paper onto the top of your iced cake.  Press it down gently (but use something like a spatula as otherwise the buttercream begins to melt from the warmth of your hands) and then carefully pull the baking paper off.  Voila!!!

It's not a completely "clean" outline, like it would be if you just piped it on directly, but it's pretty cool.  You can just touch up any areas that didn't transfer properly.  This saved me sooooooo much time and I will definatley be using it from now on.

From this.......
to this.......


The other thing I figured out is to use a couple of pieces of styrofoam as a guide when levelling the top of the cake.  I needed something about an inch high and my styrofoam was exactly that.  I covered it in packing tape to make sure I didn't contaminate the cake and then I rested the flat surface of the knife against that while I was cutting.  Levelling cakes is not something I usually do....such a waste of good cake, in my opinion....but I wanted to make sure this one looked a bit professional!

My coordinating cake pops were a hit too.  They were supposed to be orange with blue piping and grey with red piping.  If you need to use any shade containing red, other than pink, it's best to buy the melts already coloured - as you can see, mine are a little on the feminine side of the colour spectrum!  I've also improved my chocolate piping skills - I discovered that the more melted chocolate you put into the piping bag, the easier it is to use!!

Decepticon Cake Pops

Autobot Cake Pops

Transformer Cake Pops

The birthday boy was totally impressed with it all, so that's a success as far as I'm concerned.

Friday, July 22, 2011

Trio Cake Pops

I've had another opportunity to do a bit more testing:
* The cake balls (ie: crumbled cake + icing) freeze well.  Let them come up to room temperature before attempting to dip them.

* The decorated cake pops travelled fine.  I put them into an airtight container and into an esky.  It turned out the weather was cold anyway so I possibly could have skipped the esky!

* The trio's are simple to do.  However, only doing a small amount of each colour is a bit painful.  Large batches would be easier.

* I'm still trying to figure out the right chocolate melting/piping temperature.  If the piping chocolate is too hot, it cracks the coated cake pop......but if it's not hot enough it sets inside the piping bag, making it useless!!


Wednesday, June 29, 2011

Cake Pops Galore!!

I have been in cake pop land the last couple of days and I had quite a bit more success with this lot.  I went for the cake used in the Donna Hay Chocolate Buttermilk Layer Cake recipe because it's already such a yummy cake.  I've easily ended up with around 60 cake balls so I have some sitting in the freezer waiting.

Fish Bowls
Happy Birthday Faces
Mr Bump
Lego Heads


Chickens
Mr Happy

Same Colour Swirl

Triple Coat

Mr Grumpy
Anyone want to guess how long it took to place those photos on here......arrrgh!!  So not computer savvy!!  Apologies if they still don't line up, but on my screen they do.....true!

I don't like the arms - they're too hard to do (which is why Mr Happy has a few fingers and Mr Grumpy has none!) and they're not going to take transportation too well.  I'm still working on something to replace them. 

I'm also finding the biggest drama with the fondant accessories is that, even though I form them on a rounded surface, they don't completely match up to the finished cake pop surface.  This was especially noticeable on the fish bowls, for the fish themselves and for the top of the bowls.  I really don't want to have to make each piece as I make each pop.....that's just too much work!!

Anyway, lets just say that I've learnt a few more things and there are also a few things that I won't try again!  For anyone wishing to colour their own white candy melts, the powder colours are cheaper but the results are not reliable as the powder won't fully dissolve into the candy.  I will be going for the oil-based colours next time.

Sunday, June 12, 2011

Simple Pops

These were supposed to be simple.  These were NOT simple.  At the end of my decorating session I was definitely questioning my abilities.  Am I being too critical?  Too much of a perfectionist??  All I know is that piping chocolate is hard.  There has to be something I am missing.  Getting that darn chocolate into my baking paper piping bag and on to the pops was a task of epic proportions!

Looking at the photos today, however, I think they look alright.  I am not a big fan of sprinkles so I may not eat any of them, but they look.........ok.


I’m off to do a little more websurfing to see what I can find to help me along on this journey!  Oh, and I may need to sample just one cake pop to make sure they still taste ok today :oP


Saturday, June 4, 2011

Pigs, Roosters and Sundaes

So, my second batch of cake pops was a bit hit and miss.


I decided to make the cake from scratch and used the Donna Hay Basic Melt and Mix Vanilla Cake.  This recipe has become a favourite for our birthday cakes, cause it’s so yummy.  I then made a cream cheese icing to put through the mix.

I think I may add a bit less frosting next time.  I’m also not too sure about storing the cake pops, especially those that need to go in the fridge.  To begin with, my cake “dough” was too cold from being in the fridge overnight and when I coated them in the melts, they cracked :o(  The first step was then to leave some “dough” out to come up to room temp a bit before coating them, and this seemed to work.

Then I ended up with a few air bubbles on the coated balls.  Air bubbles are not good as they eventually pop exposing the cake ball beneath, which then does it’s best to escape from the coating.  I assume again that this was because the cake balls had been refrigerated as I did not have this problem with the first batch.

I made the parts for the pig and roosters a couple of days ago and set them aside to give them time to set.  The biggest difference between the Witon-style pops and the Bakerella-style pops is that Wilton tend to use a lot of fondant icing to make all the various bits and pieces, while Bakerella uses ready-made candies.  The drama for us living in Australia is that we don’t have the range of candies that they do in the US (sigh).  Obviously though, using the candies would be a quicker and easier solution as you don’t have to go through the drama of making the bits yourself.  I’ll be doing a bit of net surfing in the next couple of days to see what I can find online.

The rooster and pigs seemed pretty straight forward as you dip the pops and leave them to set and then add the various elements using melted melts (!) for the glue.  Unfortunately my fondant parts were a little on the thick side and, for the roosters, I didn’t have an actual size or shape reference (as Patrick had eaten the last of the previous batch of cake pops).  I think the pigs look reasonable but the roosters are a little scarey!  Oh and I made red beaks and then had to make orange ones.......and then ended up using the red ones!!

I then decided to have a go at making some cupcake bites.  I shaped the balls into something that resembled a cupcake and then returned them to the fridge to firm again.  I dipped the base of the cupcake into pink melts (I still found a spoon the easiest way of dipping).  I put them back into the fridge and then tried to dip the tops in white melts.  Yes, I said “tried”.  Oh my gosh, what a drama.  Let’s just say that I’ll be investing in some cotton chocolate making gloves if I want to try these again in the future.  The base melted while I was trying to hold onto it to dip the tops; and then the darn things wouldn’t stand up once I had dipped them.  I even practiced standing them up before I dipped them only to watch them outsmart me in the end.  And they look a bit more like a sundae than a cupcake :o)